

mee-table guide: for the venue manager
Everything you need to get mee-table running on your site. No technical knowledge required.
What mee-table is
mee-table is your venue's booking system, inside your own site. One single panel, and the data stays yours.
Bookings
- Widget on your site, in 8 languages, with no commission per cover
- Capacity per time slot: you decide how many guests you accept at 13:00 and how many at 21:00
- Quick blocks: close a day, a date range or single slots, for holidays or private events
- Discounts by time slot and by day, to fill the empty hours
- Floor Dashboard: who is coming tonight, confirmations, cancellations, notes and allergies
- Bookings list and exports, anonymised statistics included
- WhatsApp button so guests can contact you directly
Communications, automatic
- Request, confirmation, reminder, cancellation and refund emails, all editable by you
- SMS reminders, with your own operator or with an Android phone: we do not sell SMS
- The reminder goes out before the cancellation deadline expires, not the evening before: that is when the table can still be filled again
- Review email after the evening, optional
The money
- Card guarantee against no-show: the card is held, charged only if the guest does not show up
- Shifts by time slot on every plan, Free included; rates with an amount ("Rates by time slot / custom shifts" block): real prepayments by time slot and by day, from Gold
- Gift cards with your own amounts, redeemable in the dining room
- Refunds from the dashboard, without leaving the panel
The events that fill the empty evenings
- Dating Aperitivo and Cooking Class: sign-ups, tickets, communications and automatic reminders
- Print-ready flyers, four formats, with the date, price and QR code of the event
If you have more than one venue
- Several locations from the same panel, each with its own capacity, prices and settings
- The widget lets the guest choose the venue
The plugin talks to the mee-table.com servers to make everything work: bookings, payments and availability are not stored on your site, but on a dedicated and secure external service.
What is in each plan
During the 14-day trial you get everything, with no exceptions: gift cards, prepayments, card guarantee, events. The trial is there so you can really try it, not watch it from outside.
What you sell during the trial stays yours: the gift cards you have issued remain valid and redeemable afterwards too, even if you then choose a plan that does not include them.
| Bronze 29 € | Silver 59 € | Gold 89 € | |
|---|---|---|---|
| Fill the room | Protect your takings | Get paid earlier | |
| Unlimited bookings | ● | ● | ● |
| Hourly Capacity and quick blocks | ● | ● | ● |
| Discounts by time slot | ● | ● | ● |
| Ticketed events: Dating Aperitivo, Cooking Class | ● | ● | ● |
| Printable flyers, 4 formats | ● | ● | ● |
| Floor Dashboard | ● | ● | ● |
| Contact collection | ● | ● | ● |
| Card guarantee against no-show | ● | ● | |
| SMS reminders | ● | ● | |
| Post-evening review email | ● | ● | |
| Automatic newsletter to your CRM | ● | ● | |
| Statistics and exports | ● | ● | |
| Shifts (no amount): every plan, Free included | ● | ● | ● |
| Rates with an amount (prepayment) | ● | ||
| Gift Card | ● | ● | |
| Customisable event, created by you | ● | ||
| Multiple venues | ● | ||
| Staff accesses (owner included) | 1 | 3 | unlimited |
| Floor log: who did what | ● | ● |
For more than four venues the price is tailored: write to us.
Installation and licence activation
- Go to mee-table.com, create a free account (no card required) and log in to your dashboard.
- Copy your license key, in the format
MTBL-XXXX-XXXX-XXXX. - In your WordPress, go to mee-table → Settings.
- Paste the license key into the relevant field and click "Activate licence".
- If you need unlimited bookings or Premium features, you can upgrade from the same dashboard on mee-table.com, paying with Stripe or PayPal.
After activation, the plugin checks the licence automatically every day: you do not have to do anything manually.
Signing in and your password
Your mee-table account and your WordPress site are two different things: the password you use here is not your WordPress password.
If you do not know your password. This happens when the account was created during the plugin installation: in that case the password was chosen by the system, not by you, and nobody knows it. There is no need to ask us for it, you can set your own in a minute.
How to set a new password:
- Go to mee-table.com/forgot-password.
- Type the email address of your account and send.
- Open the "Reset your password" email that arrives and click Reset password.
- Type your new password twice and confirm. We take you back to the sign-in page ourselves.
The password needs at least 10 characters, at least one number and at least one symbol (for example !, ?, -). If something is missing we tell you as you type, before you save.
The link in the email lasts one hour and can be used only once. Open it wherever suits you: on your phone even if you asked for the change from your computer, it works just the same. If more than an hour goes by, or if you open it a second time, the page tells you so and puts the field to request a new one right there: you do not have to go back.
If the email does not arrive, check your spam folder once: it comes from [email protected].
Signing in with Google. If you signed up with the "Sign in with Google" button you have no password to remember: you always get in from there.
Setting up your location
Go to mee-table → Locations and fill in your venue's details:
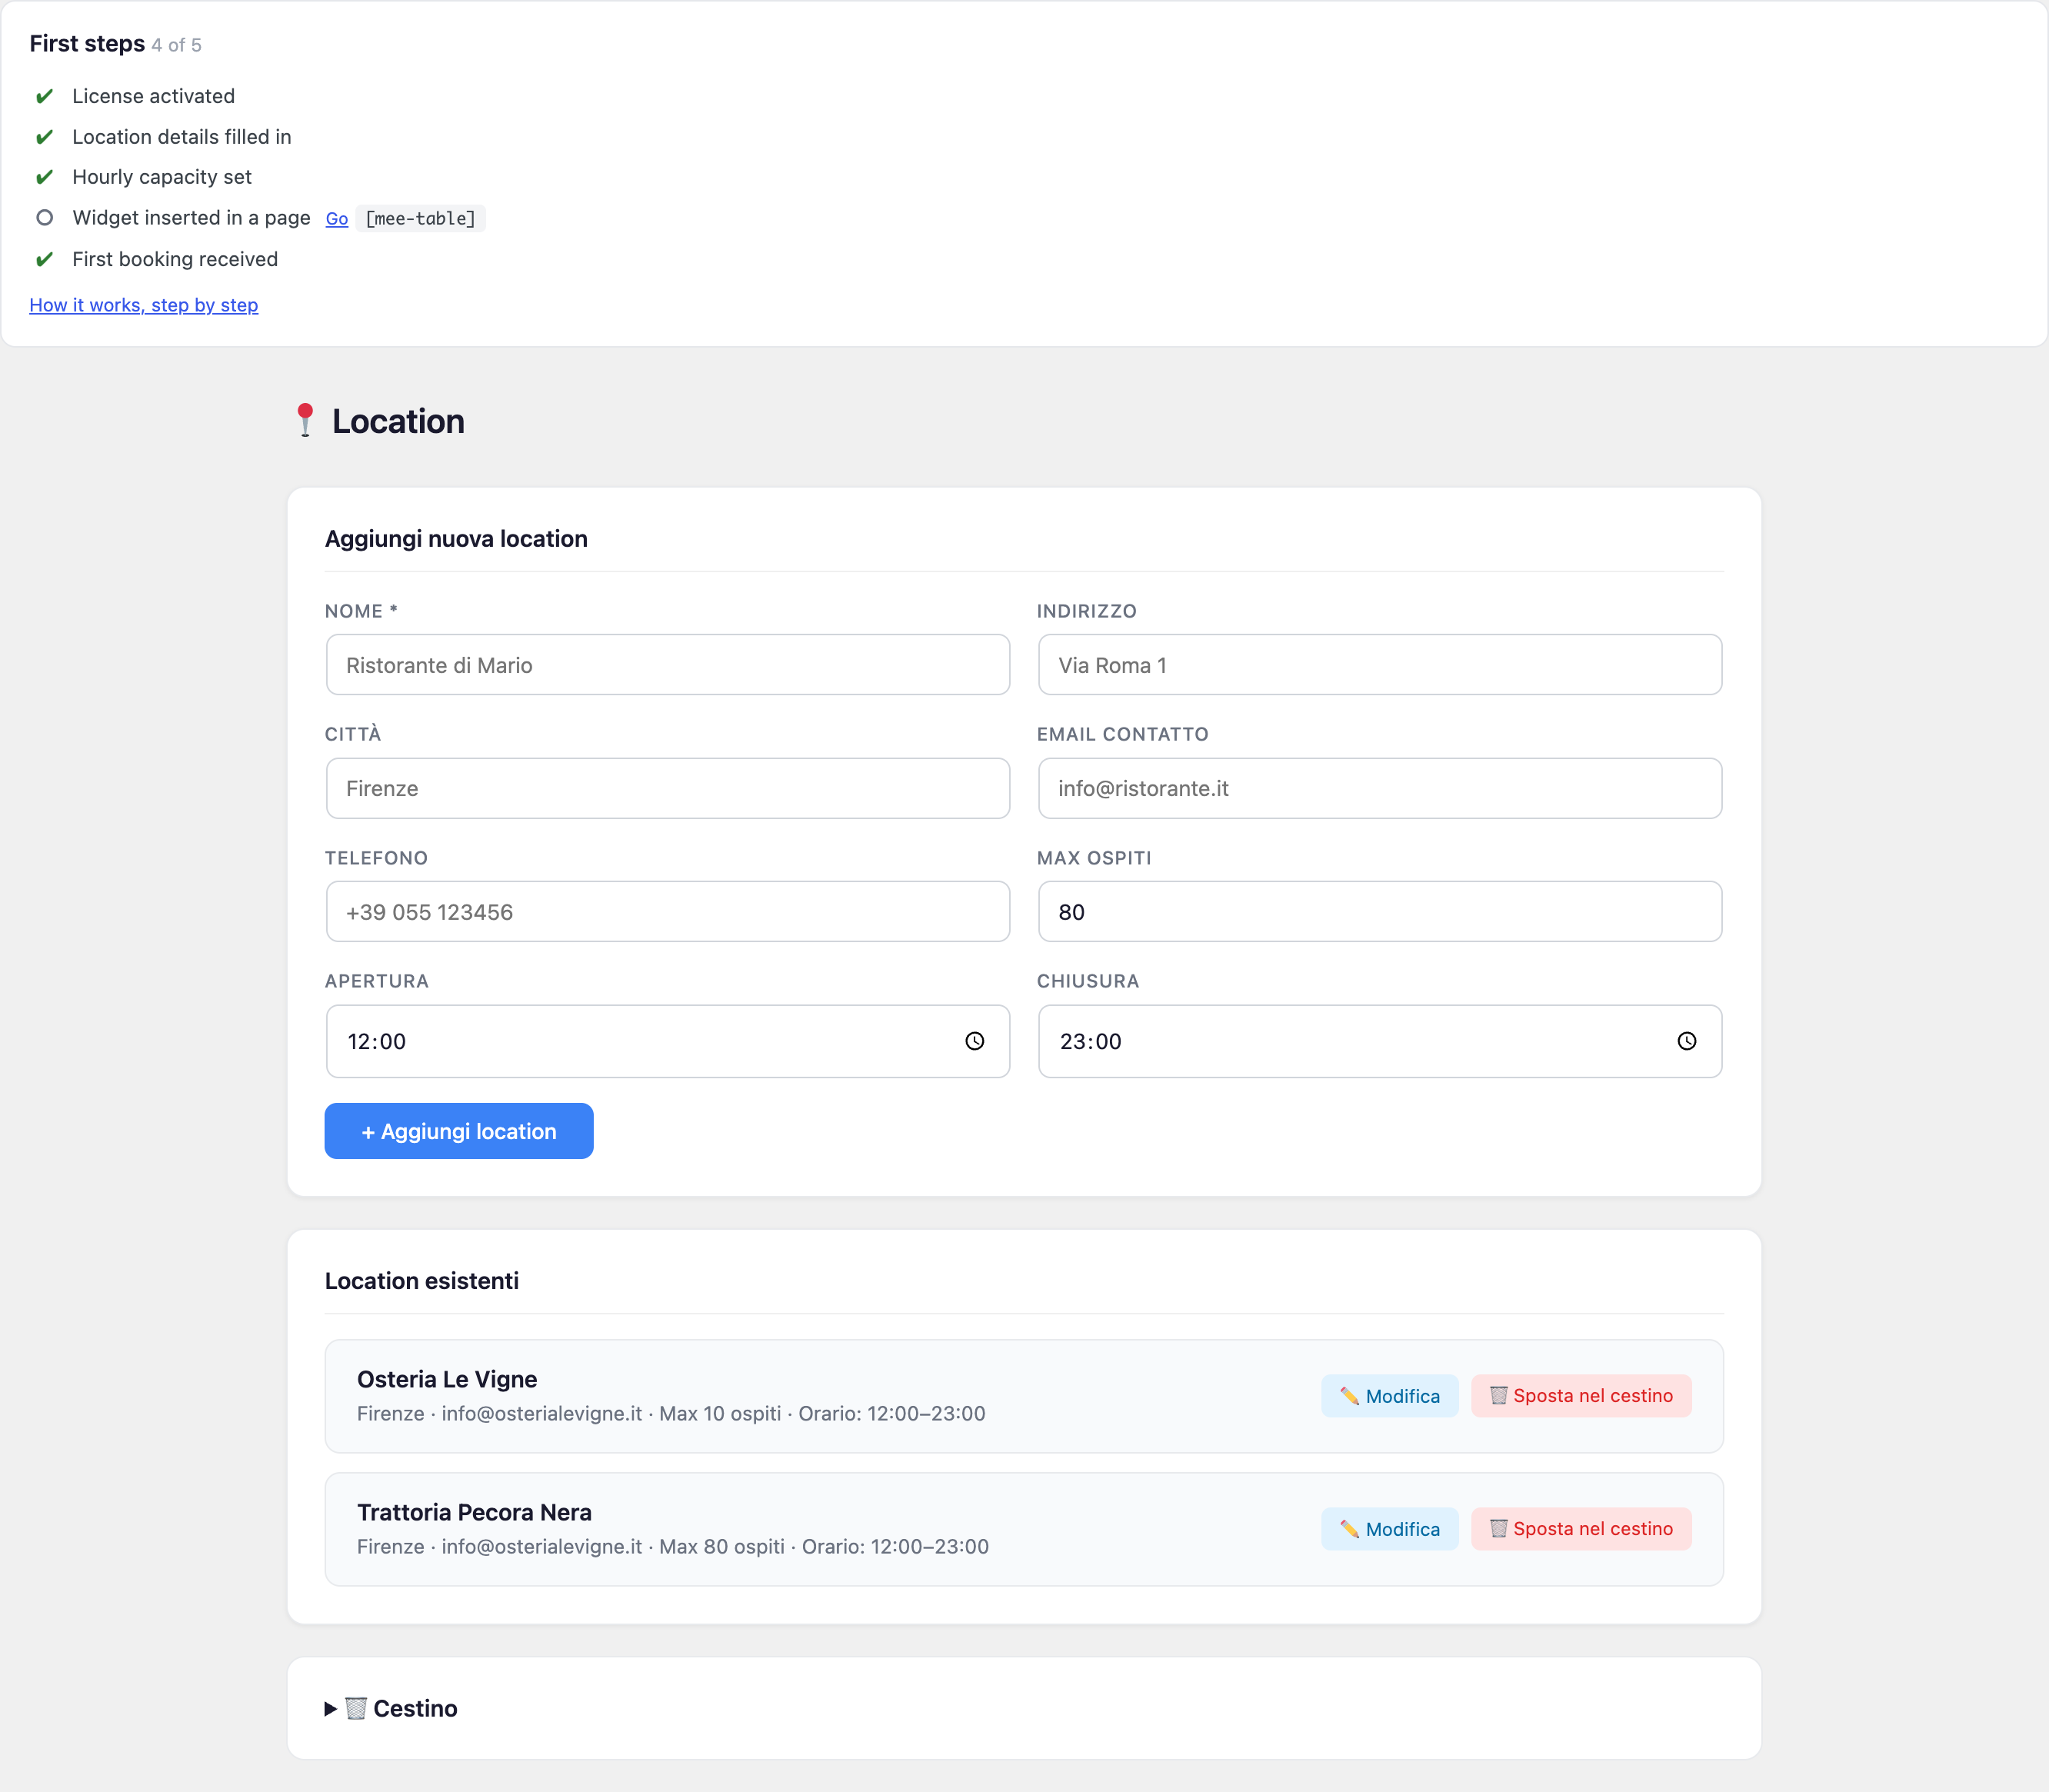
- Name, address, city: shown to customers.
- Contact email: where you receive booking notifications.
- Phone: normal contact number.
- WhatsApp (numbers only): see the section "The WhatsApp button".
- Max guests, opening/closing times: used to calculate availability.
- Lunch and dinner (optional): if you close in the afternoon, write the two windows, for example lunch 12:00–14:30 and dinner 19:00–22:30. Write the last time a guest can sit down, not when the room empties. Fill in both and the times in between disappear from the list the customer sees, and they win over opening and closing. Leave them empty and nothing changes.
If you run more than one venue, you can add them all from this same page, each one has its own independent settings (capacity, prices, no-show, and so on), except the Mollie connection, which can be shared automatically between locations belonging to the same owner (see "Settings → Global Mollie (fallback)").
Anti no-show protection (deposit)
Careful: this is NOT a payment of the bill. It is a guarantee: the customer's card is held, and the amount is charged only if the guest does not show up.
How to activate it
- In Locations, tick "No-show protection active".
- Set the guarantee amount per person (minimum 5.00 €).
- Set the guest threshold: with 1 the guarantee is always requested, with 5 only from groups of 5 or more. It is there so you do not add friction for Tuesday evening couples.
- Connect Mollie. It is the only method that can hold an amount without taking it: Stripe and PayPal charge straight away.
How you connect it, in practice: you do not have to copy any key. Go to mee-table → Settings, press Connect Mollie and the Mollie site opens, where you log in with your account and authorise. Then you come back and you are connected. If you have more than one venue you can connect a single account for all of them, or one per venue.
Mollie asks for an identity document of the owner and the bank account details for verification. You can connect straight away without waiting for that to finish: live payments unlock by themselves as soon as Mollie completes the checks.
If you do not connect Mollie the protection does not activate, and the booking goes through anyway without a guarantee.
What the customer sees
After filling in their details they are taken once only to the Mollie payment page, where they enter the card. They pay nothing: the amount is only held. Then they come back to your site and see the confirmation.
The behaviour changes depending on how far away the booking is, but for the customer it is always a single step:
- Within 5 days: the amount is held on the card straight away.
- More than 5 days ahead: the card is verified with a symbolic charge of 1 cent and saved securely. The real hold starts by itself 5 days before the date. This is needed because a card hold lasts about a week: for a dinner two months away it could not be held today, and this is the way to have it guaranteed all the same.
How to collect the penalty
When a customer does not show up, go to the Floor Dashboard, find the booking and press "No show". You are asked to confirm, because that button really does take the money from the customer's card.
The amount is released by itself, without you doing anything, when:
- you mark the booking as shown up (the customer came)
- you cancel the booking
If you do nothing, the hold expires by itself after a few days. Confirming a booking does not release the guarantee: it stays active until the evening itself.
Rates by time slot / custom shifts
The section is called "Rates by time slot / custom shifts" and it sits in the first tab of the venue: Locations → edit the venue → "Venue, hours & booking confirmation" tab, right after the opening hours. The ? next to the title opens this page of the guide. The payments tab only keeps a note that points here.
Each row can be one of two things:
- a shift, with no amount: it only decides which times guests can book. Shifts work on every plan, Free included and even without a licence, because they are saved in your WordPress site;
- a rate with an amount: here the customer really pays, right away, at booking time. It is a real advance on the bill, not a guarantee. Amounts start from the Gold plan (or the 14-day trial): below Gold the amount field is switched off, with a note.
Paying or not is decided row by row: an empty amount or 0 means no prepayment for that shift. The no-show guarantee (from the Silver plan) is a different thing: the card is held, nothing is charged right away.
Example for a venue with a terrace:
- Aperitivo 18:00-20:00
- Dinner 20:00-22:00
- After-dinner 22:00-24:00 (mostly drinks with a few snacks)
Without an amount they are three shifts; from Gold you can give each one an amount per person.
How to create a shift
- Click "+ Add tier" for each row.
- Fill in the row: times, days and the rest (below).
- Click "Save the rates only".
Under "Times shown to guests" you choose whether shifts are on (the customer sees only the shift times) or off (they see all the normal times): see "Showing only the sittings" below.
Each row is a rate or a sitting and can have:
- a name, for example "Dinner 1" (optional: without a name the row works anyway);
- an amount per person (optional: without an amount there is no prepayment for that sitting; the no-show guarantee, if you keep it on, remains);
- a time, for example from 20:00 to 21:30: you write it however you like, even 20:05 or 21:45;
- the days (if you tick none, it applies every day);
- a start and end date, for example only in summer (if you leave them empty, it always applies);
- a minimum number of people.
If you set a time, the system automatically proposes that rate to the customer based on the time they choose when booking.
Different sittings per day
You can have different times on different days of the week: one row per sitting, with its days. Example:
- Friday, Saturday and Sunday: sittings at 20:00, at 21:45 and at 23:00. Make three rows and in each one tick Fri, Sat and Sun.
- Tuesday, Wednesday and Thursday: other times. Make other rows and in each one tick Tue, Wed and Thu.
Closing at different times during the week
If the venue closes at one hour on weekdays and another on weekends, use sittings and turn on Show only the sitting times. Create one row for each group of days, with a single sitting from opening to closing. Example:
- Monday-Thursday: from 12:00 to 22:00. The last bookable time is 22:00.
- Friday-Sunday: from 12:00 to 22:30. The last bookable time is 22:30.
In each row tick the days, leave the amount blank (without an amount there is no payment) and do not tick “One time for the sitting (start, or start-end)”: this way the guest sees all times between “From” and “To”, every 30 minutes (or 15, depending on the venue's interval), and not a single button. The row name is optional. Press "Save the rates only". Four things to know:
- the “To” time is included: if a sitting runs from 12:00 to 22:00, 22:00 can also be booked;
- you do not need to cover all seven days: on a day with no applicable sitting, the system shows the venue's normal times, based on its opening and closing hours;
- discounts and hourly capacity stay linked to the time: if a time does not exist on a certain day (for example 22:30 from Monday to Thursday), the discount does not apply that day because the time is not offered;
- the time stays forever until you change it. The calendar's quick blocks are for closing single dates or a period (e.g., holidays), not for the fixed weekly times.
Showing only the sittings
Above the rows you find two choices:
- Show all normal times (default): the customer sees the usual grid, and the rate only serves for payment.
- Show only the sitting times: the customer sees only the times of your rows, grouped under their name (Dinner 1, Dinner 2, Dinner 3).
In each row you can tick "One time for the sitting (start, or start-end)": the customer sees a single button for that sitting, with the start time (for example "20:00") or with start and end ("20:00-21:30"). With "Choose which times to show (optional)" you manually choose which times to show within the row.
The time interval
In Locations there is "Time interval: every 30 minutes / every 15 minutes". It changes the grid of all the times the customer can choose: with 15 minutes they see 12:00, 12:15, 12:30 and so on; with 30 minutes, 12:00, 12:30, 13:00. It applies to the whole location. By default it is 30.
Sittings are another thing and do not depend on this setting: in the times of the rows you write whatever you want. The interval only matters if a row shows the customer all the times within its range.
Shifts without an amount are on every plan, Free included and without a licence. Prepayment amounts start from the Gold plan (or the 14-day trial).
The refund policy: there are two of them, not one
The no-show guarantee and the "Rates by time slot / custom shifts" block have two separate settings, because they are two different economies.
No-show guarantee: the card is only held, you have never taken the money. So there is nothing to give back, and what you set is a deadline for cancelling without a penalty. If the customer cancels within the deadline the guarantee is released; beyond it, if they do not show up, the penalty is yours. The typical value is 24 or 48 hours.
Rates by time slot / custom shifts: you have collected the money and you have already bought the ingredients. Here the setting decides whether it is refundable, and the default value is non-refundable, which is the standard for fixed-price menus. If you prefer to be flexible, set a wide window: 72 hours, not 24.
You can keep them different from each other. The typical case: bookings with a flexible guarantee, non-refundable 55 € tasting menu.
In every case you can always refund by hand from the Floor Dashboard.
SMS reminders
The reminder always arrives by email. With SMS it arrives as well as a message, which is read far more often. mee-table does not sell SMS and takes no commission: the cost, if there is one, is your operator's.
In Locations → 📱 SMS reminder you choose how to send them:
- My Android phone: you use a phone you already have, with its SIM and a free gateway app. It costs whatever your phone plan costs, but the phone has to stay switched on and connected.
- Twilio, Skebby, Aruba SMS, Brevo, Vonage: choose yours from the list and we ask you only for the credentials you find in its panel. The address, the authentication and the format of the request we already know: you do not have to copy anything from the documentation.
- Other provider: only if you use a service that is not in the list. There you fill in the technical fields yourself.
You do not write the text here: the SMS uses the same text as the reminder email, which you edit once only in mee-table → Emails → Reminder.
Test it before activating it
Below the credentials there is Send test SMS: write your number in international format, with the +, and press. You get a real message, with the settings you have in front of you at that moment even if you have not saved them yet. That way you know it works before a customer receives it.
mee-table checks the fields before sending, so it flags the most common errors for you without using up credit. If the message really does go out, that is a send like any other and your provider deducts the credit.
One useful note: the test goes out from your WordPress site, while the real reminders go out from the mee-table servers. If your provider only accepts sends from authorised addresses, write to us and we will give you ours to put on the list.
Gift Card
To activate them, in Locations → Gift Card:
- Click "+ Add amount".
- Write the name and the amount (for example "€25", "€50", "€100").
- Click "Save gift cards".
The plugin automatically creates a dedicated page on your site (see Settings → 🎁 Gift Card page, it works like the "Book" page). If the site has multiple languages with WPML or Polylang, it creates a page for each language and links it to the Italian one. A "Give a Gift Card" button appears by itself under the booking widget, and you can also put it on other pages of the site: see the section on shortcodes.
Payment: Mollie or Stripe Connect
Gift cards can only be collected with Mollie or Stripe Connect. They cannot be sold with PayPal or Stripe used with your own API keys: we take a commission on each voucher, and it can only be retained through Connect. If the location has not connected one, customers cannot buy them. Gift cards are available on the Silver plan and higher, and during the 14-day trial.
"Coming soon"
If neither Mollie nor Stripe Connect is ready yet, you can tick the preview for that location: the customer sees the page and the amounts, but when they try to pay they read that online payment will arrive soon. When you connect one of them, the tick no longer counts and payment works normally.
Multiple locations
If you have multiple locations, at the top of the page the customer chooses the location, with the same tabs as the booking page. You can also send a link that already opens the right location, adding ?location= and the location number.
Giving to another person
The buyer writes their name and email. Then they can write the details of the recipient: name, email and phone.
Recipient's email. If you write it, we send the gift immediately after payment. If you do not write it, the gift goes only to the buyer, who then has to forward it separately to the recipient.
Send on. If the buyer enters the recipient's email, they can choose a date from tomorrow up to 365 days ahead. The Gift Card email is sent at 9:00 in the restaurant's local time zone. Payment is taken immediately, and the buyer receives their copy right away. Gift Cards are non-refundable except where applicable law requires otherwise.
WhatsApp. The WhatsApp message is not sent automatically and cannot be scheduled. After payment a window opens with the green "Share on WhatsApp" button: the buyer taps it, WhatsApp opens with the message already written (amount, location name, code and voucher link) and they press send. If they have written the recipient's phone, the number is already in the window. If they have not written it, the window still appears and the number can be written there.
How long a voucher is valid for
Recommended validity: 18 months. It is the most common period for restaurant gift cards in most European countries, and it is the plugin's starting value. In the Netherlands we recommend 24 months.
You set it in Locations → Gift Card → Gift voucher validity. Rules differ by country: ask your accountant which validity to apply to your restaurant.
Tax and accounting. MeeTable sells the gift cards on your behalf and keeps the register: the receipt or invoice to the guest is yours to issue, usually when the gift card is used. We invoice you MeeTable's fee once a month. For VAT, ask your accountant and send them the movements CSV (see below).
Redeeming a gift card
When the guest arrives with a gift card, open the Floor Dashboard (in the WordPress panel, or on your phone with the staff login). In the Gift Card box type the code and press Check: you see whether it is valid and its balance. Type the table's bill and press Redeem: MeeTable deducts what the card covers and tells you how much is left to pay. If credit is left, it stays on the card for next time. Every redemption is recorded.
MeeTable is not your till: you type the bill. Example: the bill is €80 and the gift card is worth €50. In MeeTable type 80: it tells you "The card covers €50.00 · Left to pay €30.00". At the till, ring up the full €80, record €50 with the voucher key (every till names it its own way) and take the remaining €30. If you cannot find the key, ask your till supplier to enable it; your accountant tells you the exact way to record the voucher.
The log and CSV for your accountant
Every gift card sold is in the register, under mee-table → Gift Card. You can search by code or name and filter by month or year. For each voucher you see the amount, the balance and the fee we kept (for vouchers issued before 9 October 2026 the fee was not recorded and stays empty).
The "Export movements CSV (sales and redemptions)" button downloads a single file for the period you choose: sales and redemptions together, in date order, and for each sale also the buyer and recipient, the remaining balance, the status and the expiry. This is the file to send to your accountant, for example once a month.
Calendar and quick blocks
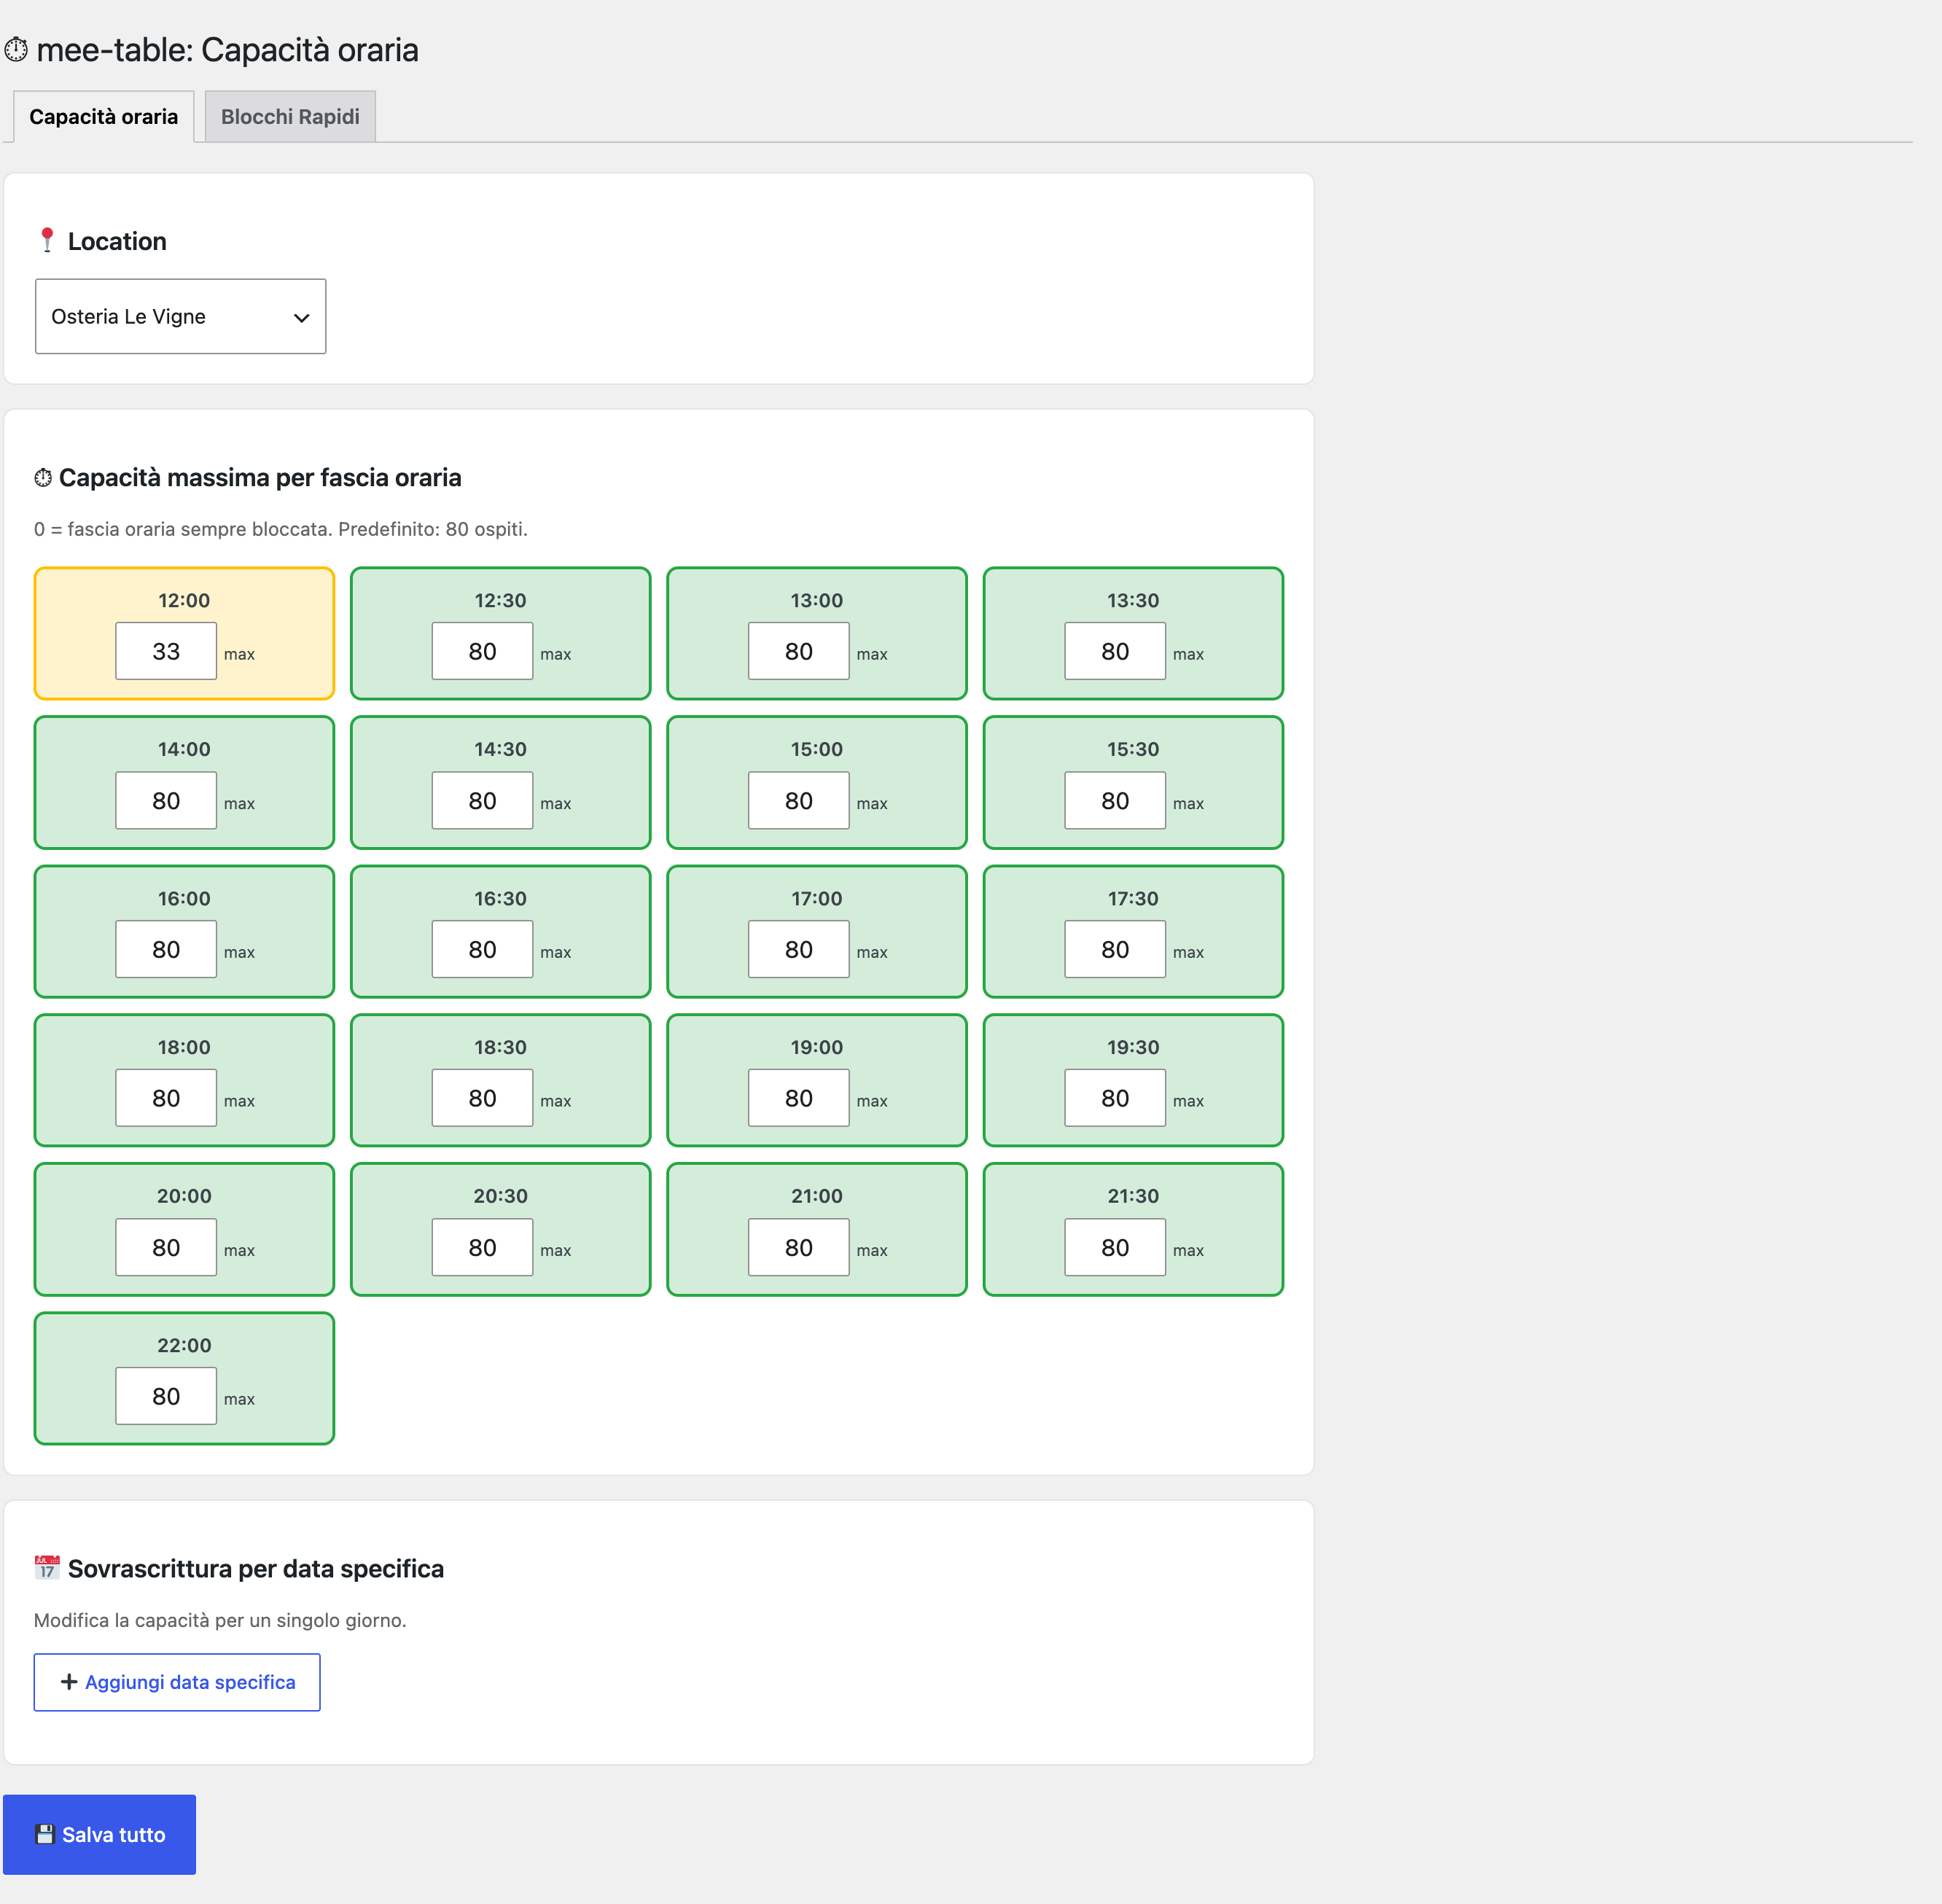
In mee-table → Hourly Capacity you find two tabs:
- Hourly Capacity: in each box you write how many guests at most you accept in that slot. If you leave 80, which is the starting value, at 20:00 you accept up to 80 people. If you write a lower number, for example 33, beyond that the slot takes no more bookings. If you write 0, that slot cannot be booked and the guest does not even see it.
- Quick Blocks: to close single dates (for example a public holiday) or entire time slots on specific days.
- Block a range (from: to): for long closures, such as a seasonal closure (for example October–April): you just give the start and end date, without having to click every single day on the calendar.
The WhatsApp button
It is just a link, not an automatic messaging service.
What it does:
- Fill in the "WhatsApp (numbers only)" field in Locations, in international format without symbols (for example the Italian number
+39 333 123 4567→ write393331234567). - Under the booking widget a "Message us on WhatsApp" button appears.
- When a customer clicks it, WhatsApp opens on their phone, with a message already written, addressed to your number.
- The customer writes, you reply normally: like any other chat.
Automatic WhatsApp reminders and confirmations (from the Silver plan): the reminder always arrives by email; with WhatsApp it also arrives as a message, which gets opened far more often. You connect your own Meta Business account from the panel (Locations → WhatsApp reminder): mee-table does not sell messages and takes no commission, you pay Meta directly.
WhatsApp reminders (from the Silver plan)
The reminder always arrives via email. With WhatsApp it also arrives as a message, which is opened far more often than an SMS. mee-table does not sell messages and takes no commission: you pay Meta directly, with your own account.
What you need, in order
- A dedicated phone number, never used on WhatsApp (neither the normal app nor WhatsApp Business). A prepaid SIM costing a few euros is enough: it is only needed for the initial verification code, after that the number lives on Meta's servers and messages go out even with the SIM switched off.
- An app on developers.facebook.com with the WhatsApp use case. Fill in the app basics right away (privacy, category, domain): an app left empty gets stuck.
- A message template approved by Meta, in the Utility category. Approval usually takes a few hours. Careful: the text cannot start or end with a placeholder.
The three values to paste into the panel
In mee-table → Locations → 💬 WhatsApp reminder choose "Meta (WhatsApp Business)" and fill in:
- Phone number ID, the long number next to your number in the Meta panel (it is not the phone number).
- Access token, the permanent one. The temporary token shown on screen lasts 24 hours: fine for testing only.
- Template name, exactly as written in WhatsApp Manager: lowercase, numbers and underscores.
Press "Send test WhatsApp": a real message goes out to the number you type, and if something is wrong the panel explains the error in plain words.
Good to know
- Meta's free test number only writes to 5 hand-registered numbers, and its templates do not carry over to your real number.
- The guest receives the WhatsApp reminder only if they gave consent when booking; without it, the email still arrives.
Where to put the shortcodes in the site
A shortcode is a short code that you insert in a WordPress page to display a feature of the plugin.
[mee-table]: shows the complete booking widget (guest choice, date, time, contact details). If you activate the automatic creation of the "Book" page (Settings), this shortcode is already inserted there for you.[mee-table-giftcard]: shows only the button "Give a Gift Card", to put on any other page of the site (for example the homepage, or a "Gifts" page).[mee-table-giftcard-page]: shows the complete form for buying a gift card (choice of amount, buyer details). It goes on the page dedicated to gift cards: if you activate the automatic creation (Settings → Gift Card page), it is already inserted there.
To use them: create (or edit) a page in WordPress, and paste the shortcode into the text, for example:
`
Come and see us!
[mee-table]
`
The shortcodes, and what each one is for
A shortcode is a word in square brackets that you write inside a page: WordPress replaces it with the real thing. There are five of them.
[mee-table]the booking widget. It is the one you use almost always.[mee-table-giftcard]the "Give a Gift Card" button, to put wherever you want.[mee-table-giftcard-page]the complete gift card purchase form. You do not have to write it yourself: if you have activated the automatic creation of the Gift Card page, the plugin creates a page that already contains this shortcode. You only need it if you prefer to put the form on a page you have made yourself.[mee-table-privacy]the venue's privacy notice, generated automatically with its details. Next to the consent box in the widget the law requires a notice: with this you publish it without writing it. If you have more than one venue,[mee-table-privacy location_id="4"]generates the one for the right venue.[meetab_staff_dashboard]the floor dashboard on the site, for those who do not want to let staff into wp-admin.
Printable posters, and the right photo
From mee-table → Events you find the buttons to print the poster with the QR code. The flyer always shows the next event on the schedule: if there is none it tells you so, instead of printing a date that has already passed.
Three formats, and they are not the same sheet enlarged:
- A3: a poster, looked at from a distance. Large title, 85 mm QR code.
- A4: shop window or wall, read from a couple of metres away.
- A5: table stand, portrait or landscape for the fold-open photo frames.
Each size has its own layout because what makes a text legible is the distance you read it from, not the size of the sheet. A title that works at 40 cm disappears at 4 metres.
You do not print the A3 in the office, you take it to a print shop: it is the cheapest large format there is.
The photo
It has to be landscape. On the flyer and in the email it sits in a wide band: of a portrait photo only a central strip is visible, usually the wall behind the plate.

This is the photo actually on the Dating flyer above: landscape, the food front and centre. A photo like this carries the flyer and the email.
When you choose the file a 3:2 crop appears that you can move and enlarge. On confirming, the photo is reduced and lightened before it leaves your computer, so the 15 MB that a phone produces today never get uploaded.
The panel tells you straight away up to which format that shot holds up: for A3 about 2200 pixels of width are needed, for A4 about 1550. If the photo is small it writes it to you in orange. It is not a formality: compressing better does not invent pixels that are not there, and a small photo printed in A3 looks grainy.
Discounts by time slot
It is the tool for filling the hours when the room is empty, without lowering the price of everything else.
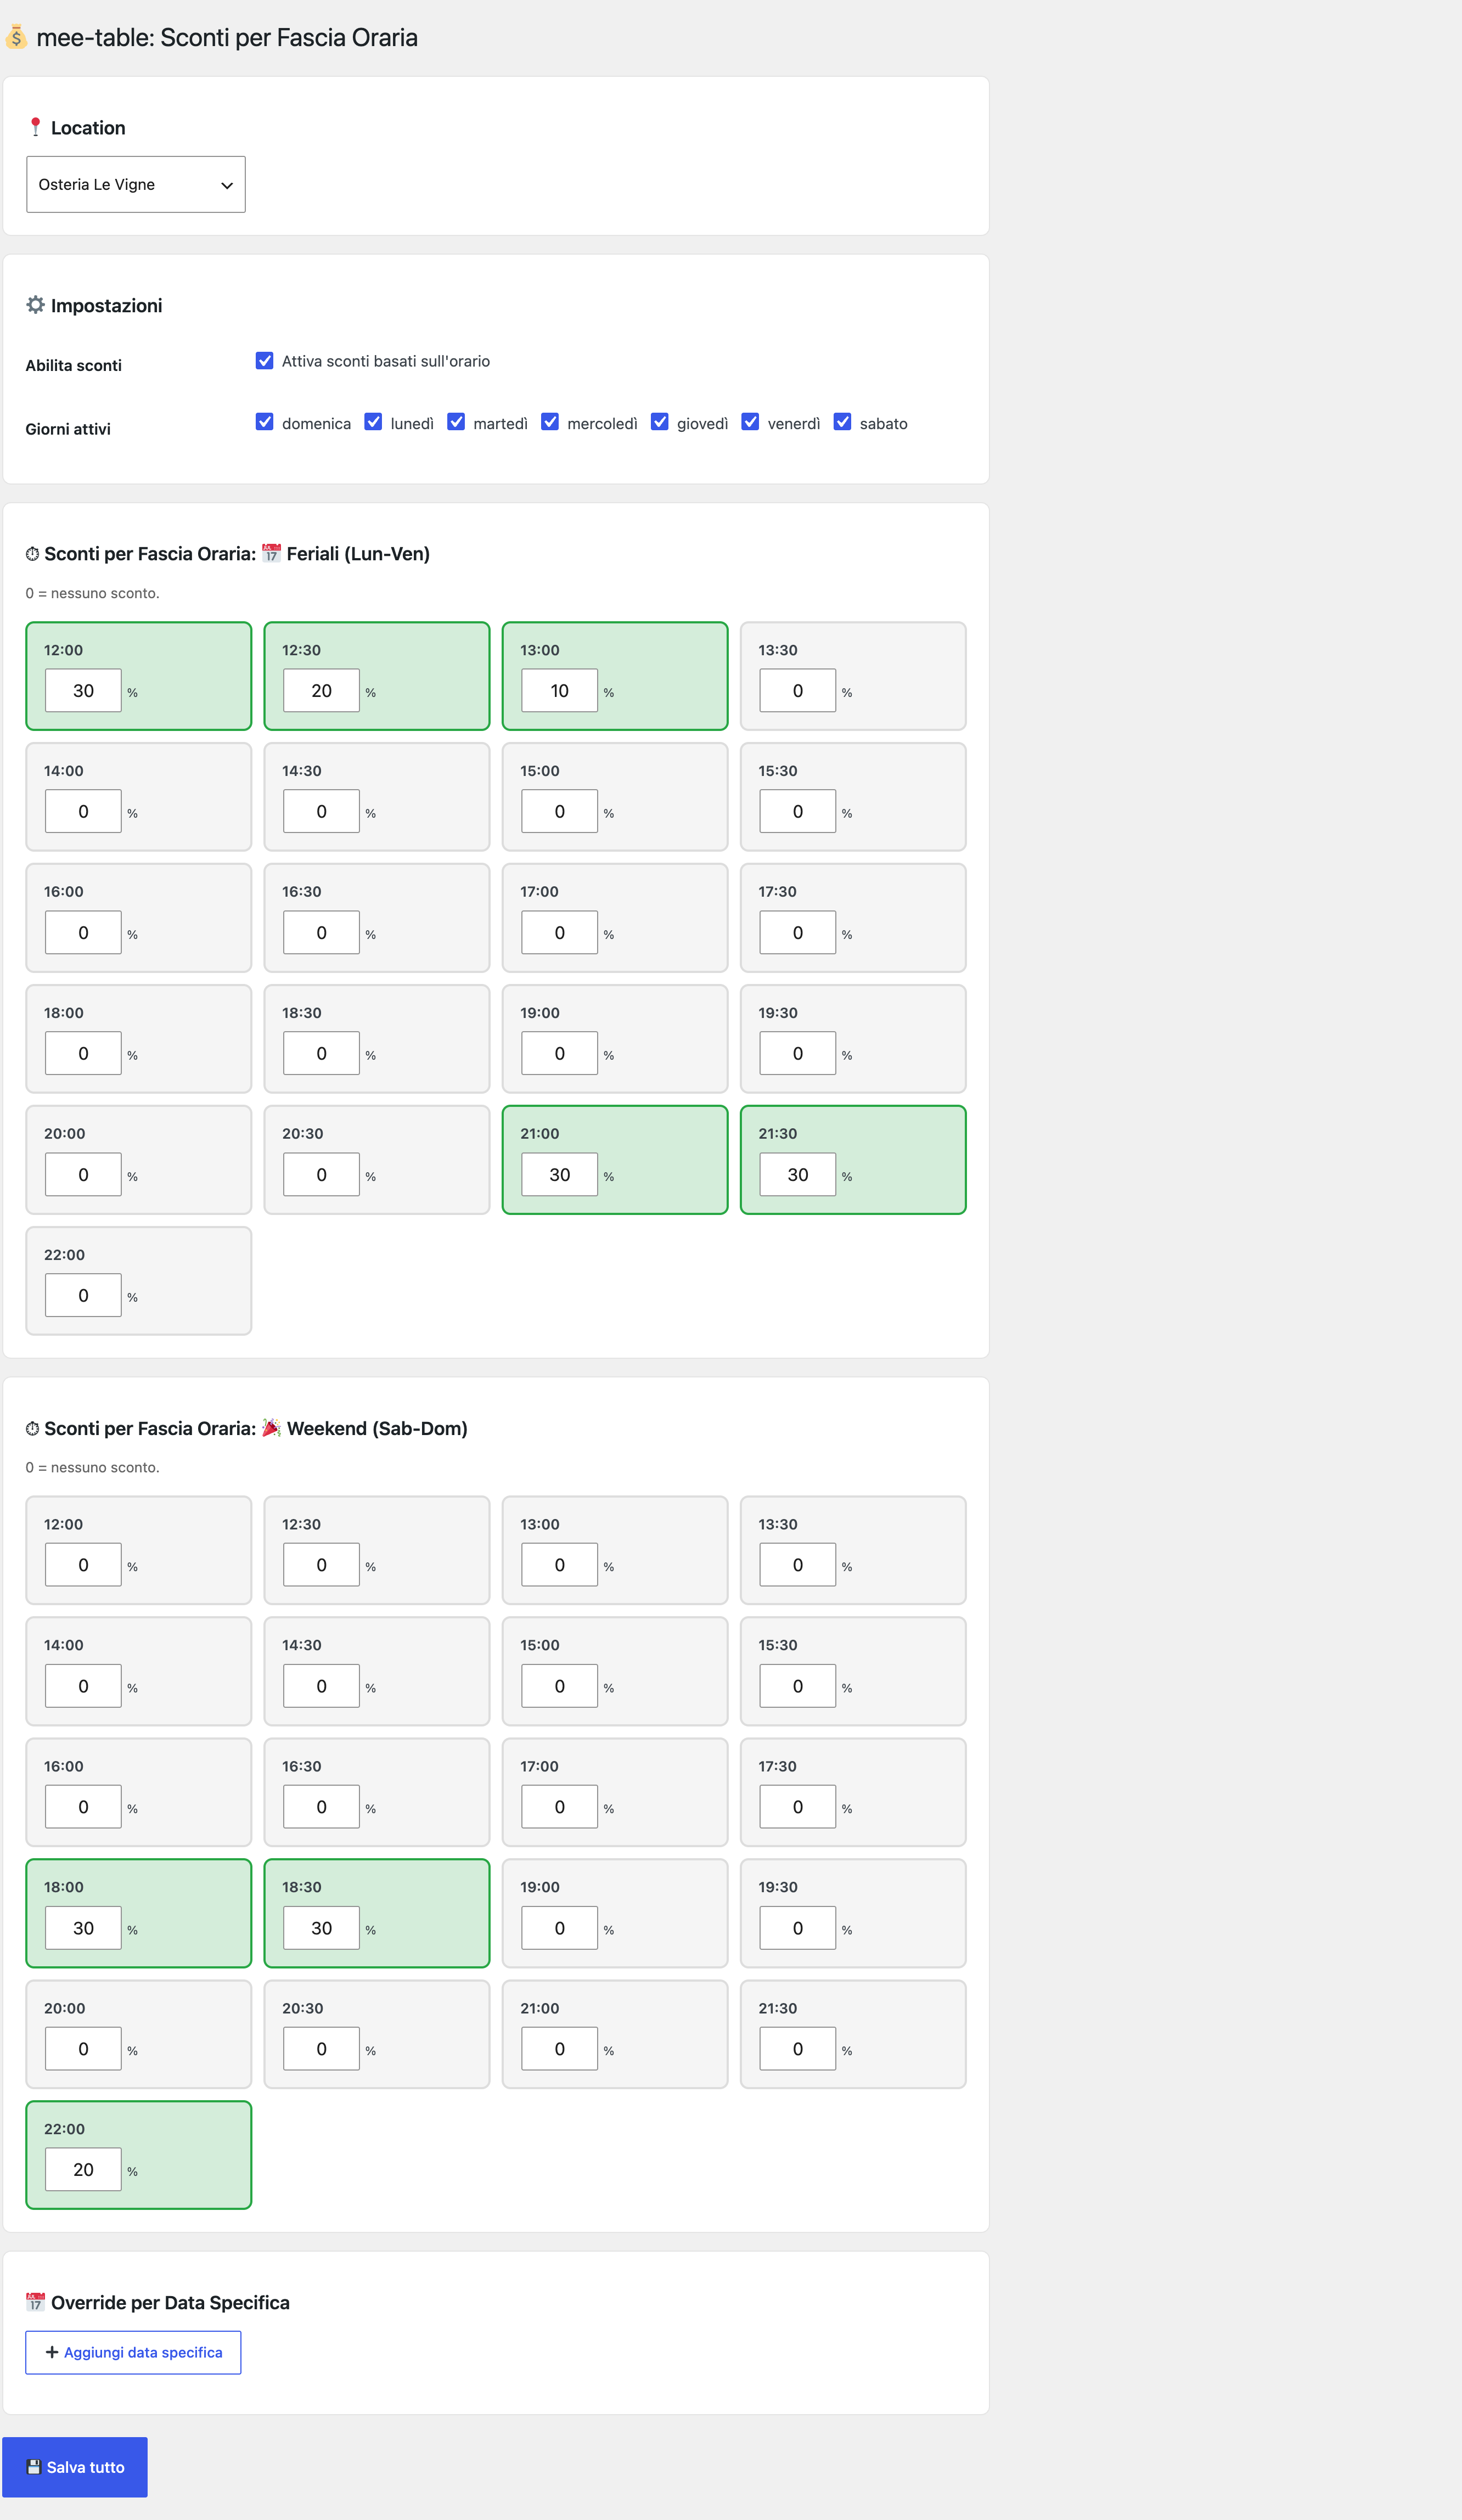
Go to mee-table → Discounts:
- Tick Activate time-based discounts.
- Choose the active days: the discounts apply only on those.
- Put the percentage in the slots you want to empty. 0 means no discount.
Weekdays and weekend have two separate grids, so you can discount Tuesday at 21:00 without touching Saturday.
With Override for a specific date you change the discounts of a single day, for example a festive evening or an event night.
The guest sees the discount while choosing the time, with the label next to the slot: that is what moves them from 20:30 to 21:00.
Bookings and Floor Dashboard
In the mee-table menu, the bookings page changes depending on the plan: you see only one, never two.
With a license (Bronze, Silver, Gold and during the trial) you find mee-table → Floor Dashboard. It's the service page, the one you keep open in the evening, and it contains all bookings. You filter by today, this week, this month or a precise date, and from there you confirm, cancel, mark who has arrived and who has not shown up. The No show button is also the one that collects the penalty, if the guarantee is active.
Without license (free version) you find mee-table → Bookings: the list with date, time, guests, name, email and status. The Floor Dashboard remains locked with the padlock 🔒 and appears when you switch to a paid plan.
Staff login from the phone
Your floor staff do not need a WordPress user. They sign in from their phone with the Staff Login button under the booking form, or from a page of your site with the shortcode [meetab_staff_dashboard]: they pick the venue, type email and password, and see the venue's bookings with the same data as the Floor Dashboard, set menus included.
How to create an access. In mee-table → Locations, in the venue's card, there is the box 👤 Staff: Waiters and Managers. Type Name, email, Password (min 10 chars), choose the Role and press + Add. To remove an access press 🗑: it takes effect at once, because the server checks on every action that the person is still active. Until you remove it, the access does not expire.
The roles.
- Waiter: confirms, cancels, moves and marks the no-show (which collects the deposit, and sends an email to the restaurant with the name of who marked it).
- Manager: everything a waiter does, plus refund a payment and waive the no-show charge.
- Whoever checks tickets at the door of an event has a door access, created from the event page.
To move a booking tap Move: choose the day, see available times with remaining seats, and confirm. The guest receives the new time by email. They can also do it themselves from the link in their email, without calling. By default all staff can do it, like canceling; if you prefer, you can restrict it to the manager (see 'What staff can do').
Which plans. The Floor Dashboard and the staff login are paid features: without a licence the menu item has the 🔒 padlock and you see your bookings in mee-table → Bookings. Accesses, owner included: 1 on Bronze, 3 on Silver, unlimited from Gold and during the 14-day trial. Only active accesses count: when someone leaves, remove them and the seat is free again.
Exports
From the Dashboard you download:
- Service list: the list to print and keep on the stand.
- Bookings in CSV: for your spreadsheet or your accountant.
- Marketing database: only those who have given newsletter consent, to import into your sending tool.
- Anonymised statistics: without names, emails or phone numbers, with the charts, to view on screen or download in print-ready HTML.
The exports come out in the language of the panel.
Set menus on the dashboard
A guest who bought a set menu shows it in the Discount / Menu column, with the full name wrapping onto a second line instead of being cut off: a waiter reading "SPECIAL LUN..." does not know what to bring to the table. The same name, with the price, also appears on the phone dashboard, together with the box of set menus to prepare.
At the top of the page a box counts the portions per service, that is per day and time (Saturday 12:30, not "this week"), because that is how a kitchen prepares them. Cancelled bookings and no-shows are not counted.
The Received column says how much you already took in, and nothing else. What is left to pay belongs to the bill, along with the drinks and the covers: a reservation list cannot know it.
The automatic emails
In mee-table → Emails you decide what arrives, and when, both to you and to the guest. Every text can be edited: subject and body.
The moments covered:
- New booking to the restaurant, as soon as it comes in
- Awaiting confirmation to the guest, if you confirm by hand
- Confirmed to the guest
- Reminder to the guest, before the cancellation deadline expires
- Cancellation and refund, to both
In the texts you can use the variables in double curly braces, which the system replaces with the real data: {{nome}}, {{data}}, {{ora}}, {{ospiti}}, {{location}} and others. The panel lists them above the editor.
Do not change the name of the variables, not even by translating them: {{nome}} stays {{nome}} in an English text too, otherwise instead of the data the wording comes out just as it is.
There is also a fallback restaurant email, used when a venue does not have a contact address of its own.
The events: what they are and what they are for
The events serve one purpose only: filling the evenings when the room stays empty. They are ticketed evenings, so the guest pays in advance and you already know how many they are.
They are created from mee-table → Events. For each one you set date and time, ticket price, capacity and a discount on the ticket if you want to run a pre-launch. The panel tells you how many tickets you have sold, and from there you close or cancel the event.
To sell tickets you need Mollie connected.
Dating Aperitivo
An evening for singles, standing up, with drinks and finger food: it takes up no tables and requires no table service.
How it works:
- The participants sign up online and buy the ticket. They fill in a short profile: a photo, their age, two lines of description.
- In the evening they meet each other in person, at the aperitivo.
- The next day they vote, with a swipe mechanism, on the people they have already met. Not photos of strangers: people seen face to face. That is the difference with dating apps.
- If the like is mutual it is a match: the contact is unlocked by paying a 20 EUR deposit, which they find deducted from the dinner bill.
- The couple books dinner with you, and you can steer them towards a discounted slot, filling another empty evening.
So from one evening you fill two, and the second is a real dinner, not an aperitivo.
For every event mee-table generates the flyer to print, in four formats, with the date, price and sign-up QR code: see the section on posters.
Cooking Class
A cookery lesson in your venue, at the times when it is closed. Those who sign up buy the ticket, cook with the chef and eat what they have prepared.
It has a presentation page with a title, description and photo, which you fill in, and from there the tickets are sold. Recurring sessions can be created, for example every Thursday.
It is the event that monetises the closed venue: no covers taken away from service.
Wall4Art
Real works of art on the walls of your venue, changing every month.
It works the opposite way to how you would imagine: you do not rent out your walls, you rent the works. You pay a fee based on how much wall you use, and the artist receives a recurring share for the whole time their work stays with you. No new production, and no unpaid artist while their work is hanging.
Why it pays off for the venue, even though it pays a fee:
- The opening. Every change of works is an evening: the artist comes, their people come, and that is twenty people drinking at least one drink each. You earn back a month's fee right there.
- The walls change every month. Those who follow art come back to see what is new, and those who come back for the art then have dinner.
- The guest can buy the work, by scanning the QR code from the table. Or take it home themselves in turn: "how much does it cost to keep it for a month?". That starts from your table too.
For the artist it is a month of exhibition in front of people who never set foot in galleries.
How much it costs:
- it starts from 29 € a month for the small format (50x50 cm), up to 150 € a month for 3 square metres of wall
- every wall is insured up to 3,500 €, and the deposit is fully refundable when you close the space
- the fee becomes credit: every euro spent on rental counts as a down payment if you then buy the work
- mee-table customers get an automatic discount, because the two platforms are connected
Not only restaurants: clinics, shops, offices, libraries, hotels and private homes too.
It is not connected to mee-table yet. In the panel you find it as "coming soon", with the link to see the platform. When the integration is ready, spaces and works will be managed from here.
Customisable event
Ready. In the panel's Events page you name the evening (Valentine's Day, Christmas, New Year's Eve or anything you invent), describe it and pick the photo. Under the form there are the buttons to open the page your guests see and to print the flyer in A3, A4 or A5: the QR code on the flyer points to that page, where the booking form sits under the description of the evening. There are no tickets and no numbered seats: the evening is booked like a normal table.
The Settings: what you set once only
In mee-table → Settings are the things that apply to the whole site, not to the single venue.
The look of the widget
- Use the theme's font and style: if you activate it, the widget takes the fonts of your site instead of its own. It is there to make it look like part of the page and not a piece stuck on.
- Buttons in capitals, like my theme: if your theme displays buttons in uppercase, the booking widget does the same. It is off by default.
- Also on the courses page: a separate switch, off by default. The courses page only has mee-table buttons, and is usually fine as it is; turn it on if you want it in uppercase like the rest of the site.
- Main colour: choose the colour of the buttons and of the highlighted elements. The starting value is a warm gold.
The pages created automatically
- Book page: mee-table can create it by itself, with the name you choose. It is the page the Google link should point to, instead of the home page.
- Gift Card page: the same thing for gift cards, with the complete purchase form.
- Cooking classes page, Special events page, Set menus page: one for each experience you sell. Each has its own switch and its own Page name: what you write there becomes the page title on your site, its address, and the wording of the button under the booking widget too. Write "Set menus" and the button says "Set menus".
- Under each switch there is "Add it to the site menu too". Not every theme allows it: if yours draws its menu on its own (block themes, for example), the plugin says so right there and the page is created anyway. You add the menu link yourself under Appearance, Menus.
- The courses page is created automatically when you have at least one active future lesson; without courses it is not created. It is called 'Cooking classes' in the dashboard language, and you can change the name. It is optional: uncheck Create a page on my site for the classes and it will not create it. The plugin never deletes a page and does not recreate one you removed.
- The Cooking class button under the widget always leads to this page on your site; if the page does not exist, the button does not appear. Only Dating Aperitivo stays on mee-table.com.
- These pages show the experience inside your own site, with your header and your menu around it. Bookings and payments work exactly as they do on the mee-table page.
- On a multilingual site (WPML, Polylang) the page is created in every language, and renaming it from the panel renames the one in the language you are working in.
If you prefer to decide yourself where to put things, you deactivate the automatic creation and use the shortcodes.
The waiter
From here you create the waiter user, who only gets into the Dashboard and does not see the rest of the panel. It is there to give access to the service without giving the keys to everything.
What staff can do
Each location decides, action by action, who can do it from the mobile dashboard: all staff or manager only. There are six actions: confirming a booking, canceling it, marking a no-show (which collects the deposit), refunding a payment, waiving the penalty for a no-show, and moving a booking. If you do not touch anything, default applies: confirmation, cancellation, no-show, and moving can be done by all staff, refund and waiving only by the manager. Change this in mee-table → Locations, in the Staff permissions on mobile dashboard box. The manager can always do everything, and every no-show sends an email to the restaurant with the name of who marked it.
The payment methods, and what each one is for
You can connect three services, and they do not do the same thing:
- Mollie: it is the only one that can hold an amount without taking it. So it is needed for the anti no-show guarantee, and it is also used for prepayments, gift cards and event tickets.
- Stripe and PayPal: if you already use them, you can connect them as collection methods. They cannot do the guarantee, because they charge straight away.
- Stripe and PayPal with your API keys are a bridge for advance table payments: they are offered only until Mollie (verified) or Stripe Connect is active for the location. From that moment they turn off automatically. Each has a switch for the whole site (Settings) and one for each location (Locations, Payments): turning it off does not delete the keys. Keep them until already paid bookings have passed, because they are needed to refund them from the plugin.
- PayPal is only useful in the first days, while Mollie or Stripe verify your account. After that, switch to Mollie or Stripe Connect. With PayPal, someone who has paid can open a dispute and get a refund even if the ticket is non-refundable: PayPal does not protect the seller in these cases. For this reason, gift cards and services with a fee are sold only with Mollie or Stripe Connect.
The credentials put here count as a fallback setting for all venues: a venue can always have its own.
Privacy
One address of your privacy notice valid for all venues, used when one does not have its own. It appears in the widget next to the consent box, and it is required by law.
If you delete the plugin, your data stays
Deleting the plugin from the Plugins page does not delete what you wrote: your reservations, customers, venues, time slots, discounts and hourly capacity stay where they are, and are still there if you install it again. Only what the plugin generated by itself is cleaned up, such as caches and counters.
At the bottom of the Settings there is a box, "If you delete the plugin", with a switch that is off to begin with, for anyone who really does want everything gone. With it on the deletion is immediate and there is no undo: only a backup of your site could bring anything back.
Outside Europe (for example in the United States). Mollie works only with European countries: where it is not available, connect Stripe Connect. With Stripe Connect these work: prepayment and the no-show guarantee for tables, class tickets, gift cards and the class gift. For now these do not work without Mollie: dating/aperitivo tickets and paid set menus.
Mollie: Live or Test
Next to the Mollie option there is a Live / Test switch. In Test you can try a booking with a payment without moving real money: it applies to set menus, cooking classes and gift cards. Remember to switch back to Live before you open to the public, because in Test guests book without paying anything and you receive no money.
Automatic or manual confirmation
For each venue, in Locations, you decide what happens when a booking comes in:
- Automatic confirmation on: the booking is confirmed straight away and the customer receives the confirmation email. Less work for you, but you accept everything that fits into the capacity.
- Automatic confirmation off: the booking stays pending, the customer receives an email telling them so, and it is you who confirms or refuses from the Floor Dashboard.
The second one is the right one if you have a small room, if you work on tight sittings, or if you want to look at the requests from large groups before saying yes.
Guest assistant
A chat on your own site that answers your guests' questions for you: what time you open, whether there is still a table for four on Saturday night, which discounts are running, which events are coming up. It reads the data you already entered for bookings, you do not have to write anything.
It shows up as a small bubble in the bottom right corner of the page that holds the booking widget. Guests with a question open it; everyone else never notices it.
What it never talks about
- Prices.
- Allergens and intolerances: it tells the guest to ask you. That is deliberate and cannot be switched off: by law, that information has to come from the restaurant, in writing.
- Other guests' bookings: it counts the free seats, it never says who took them. Your guests' names, phone numbers and emails never leave your site.
Switching it on: the key
The assistant runs on a free key that you open yourself, in two minutes, at Groq. It is yours: yours is the account, and yours is the per-minute question limit, you share it with nobody. While the box is empty the plugin contacts no server at all and the chat does not appear.
- Go to mee-table → Guest assistant
- Open
console.groq.com/keys - Sign in with your Google account (no credit card is asked)
- Click Create API Key
- Give it any name, for example "mee-table"
- Copy the key, it starts with
gsk_ - Paste it in the box and press Save
Groq shows the key only once. If you lose it, create another one, nothing breaks. To switch the assistant off, press Remove key and switch off: the chat disappears from your site.
If you run more than one venue, the key goes in for each one: every venue has its own, and the chat answers with the data of the venue the guest picked.
Pages of your own site (optional)
On the same page you can tick up to five pages of your site that the assistant may read to answer: the menu, how to get there, parking, whether dogs are welcome. It reads them from your WordPress, you upload nothing, and nothing else on your site is read.
Even with the menu in front of it, on allergens it still tells the guest to ask you.
Lunch and dinner
If you close in the afternoon, declare the two windows under Locations (see "Setting up your location"). The assistant uses them to understand what "tomorrow at lunch" means, and the list of times stops offering the hours in between.
What leaves your site
When a guest asks something, what goes to Groq is the question and your venue's public data: name, address, phone, opening times, free slots, discounts, events. Nothing else. Groq does not keep those questions and is not allowed to train its models on them.
Languages: translation is optional, but either you do it fully or you do not do it
This is the thing almost no restaurateur knows, and it costs them positions on
Google without them noticing.
The problem. mee-table pages have the interface already translated into
several languages: the buttons, the labels, the days of the week. But the text
you write, the name of the course, the description of the menu, the included
items, stays as it is. mee-table does not offer a language you have written nothing in: the EN button of the set menus appears only if at least one menu has English text, and on courses the selector shows only the translated languages. But if you translate one field and not another, the missing fields stay in the source language: the guest gets the buttons in Dutch and your description in Italian. Half and half.
Why it hurts. Google says it clearly: *localized versions of a page are
considered duplicates if the main content remains untranslated*. Google, in
addition, understands the language of a page by reading the text, not from the
labels: declaring one language and writing another is of no use. So a half-translated page is not better than
nothing: it is worse than a page in a single language done well.
What to do, in practice.
- If you have the text in English, write it in full: name, description,
included items. Not half a field yes and half no.
- If you do not have it yet, leave the English fields EMPTY. The guest
reads the Italian version, which is honest and works better than a hybrid
page. That is also the reason those fields are not mandatory.
- Do not use automatic translation alone. Machine-translated text that
nobody has reread often sounds unnatural and convinces the guest less:
have a person reread it.
- Titles and descriptions count as much as the text. If you translate the
page but leave the title in the source language, in that country the guest
reads a search result they do not understand, and does not click.
In short: one language done well beats three languages done halfway. When
you are ready to do another one, do it fully.
Source: Google Search Central, *Tell Google about localized versions of your
page*.
Practical FAQ
Can I have more than one location with a single licence?
It depends on your plan: some licences allow more than one location, others are limited to just one. Check in your mee-table.com dashboard.
What happens if a customer cancels the booking?
If they have paid a no-show guarantee, they are refunded if they cancel more than 48 hours before the booked time. Within 48 hours, the amount is retained (an anti no-show deterrent) unless you decide otherwise as manager.
How do I know whether a booking is confirmed or pending?
From the Floor Dashboard, where you see the status of every booking (confirmed, pending, cancelled) and can manage them.
Do I absolutely have to connect Mollie?
It depends on what you want to do. For normal bookings, without a guarantee and without payments, it is not needed.
It is needed instead for everything that moves money:
- the anti no-show protection (it is the only one that can hold an amount without taking it)
- the Rates by time slot / custom shifts block, that is the prepayments
- the sale of gift cards
- the event tickets: Dating Aperitivo, Cooking Class
- the refunds, which are done from the Floor Dashboard
In practice: if you only want to receive bookings you can do without it, if you want to collect money you cannot.
How do I contact support?
Through your dashboard on mee-table.com/dashboard.
Plugin version: 1.0.0
mee-class: classes and tickets
With mee-class you sell real classes with a teacher: cooking, ceramics and painting, yoga and pilates, music and languages. The customer chooses the date, pays online and receives a ticket with QR code by email. At the door you scan the QR code and see at once who has paid.
mee-class is a separate plugin, from the mee-table family. It works on your WordPress site, but sessions, seats, payments and reminders run on mee-table.com.
Installing and activating
- Install the mee-class plugin from the WordPress panel, like any plugin.
- Go to mee-class → Settings.
- Paste the license key you find in the mee-table.com dashboard and press Save.
If you have already installed the mee-table plugin, the location key is picked up automatically and you do not have to do anything.
After activation, create a page and insert the shortcode:
[mee-class]shows the class booking page.[mee-class-porta]is the entrance page with the QR scanner.
The scanner works with any phone, also on iPhone. No app to download.
Creating classes
In the WordPress panel, the Classes menu lets you create the dates. You can choose:
- Single dates or repeating classes, for example every Thursday.
- Seats available for each date.
- A booking cut-off (how many hours before the class bookings close).
For each class you decide:
- Adult price: minimum 10 EUR.
- Child price: minimum 5 EUR, only together with at least one adult in the same order. Maximum 3 children per adult.
- A children-only class uses the normal ticket, so minimum 10 EUR.
- You decide the ages, based on the class.
Payment is always in advance. There are no free events: a class with a teacher must be paid in advance.
Paying and collecting
To collect money you need a Mollie account on all plans. The customer can pay with:
- Card via Mollie, on all plans.
- PayPal, only on the Pro and Pro Multi plans.
The money arrives directly in the location's account. On paid plans there is no commission on tickets. On the Free plan you collect only by card via Mollie, which deducts the commission automatically.
The ticket and door check-in with the QR code
After payment, the customer receives the ticket with the QR code by email. If you tick "Show guests a box for notes and allergies" in the panel (off by default), guests can write allergies and intolerances when they book.
At the door open the [mee-class-porta] page, point the phone camera at the QR code and see at once who has paid.
Online classes and languages
You can also sell online classes by video call. Guests abroad see the time in their own time zone, with no maths to do.
With WPML or Polylang, the booking page is created in every language of the site automatically.
Gifting a class
On the classes page there is the "Gift a class" button. The giver chooses an amount (a credit in euros, from 5 to 300), types their own name and email and, if they like, the recipient's name, email or WhatsApp.
- The recipient uses the credit when booking a class: they choose the date, pay the difference if the class costs more, and whatever is left stays on the voucher.
- The credit is valid only on classes, not on dinners.
- It lasts 12 months from the day of purchase. This is fixed and does not change with the validity you choose for the restaurant's gift cards.
- If the giver types an email, the voucher reaches the recipient right after payment. Or they choose "Send on": a date from tomorrow up to the next 90 days, and the email goes out at 9:00 in the restaurant's time zone.
- After payment a window opens with the green WhatsApp button: WhatsApp opens with the message ready and the giver presses send. The message does not go out by itself and cannot be scheduled.
What you decide. In the mee-class plugin settings, under "Class gift", you choose for each venue whether the gift is on or off and which amounts to offer (whole numbers between 5 and 300 €). If you choose nothing, the gift is on and the amounts are 25, 50, 75, 100, 150, 200, 250 and 300 €.
What it costs. 5% on each credit for those with a paid mee-class plan (10% on the free plan), with a maximum of 10 € per credit. The payment provider's fees are separate. It is paid with Mollie or, if Mollie is not connected, with Stripe Connect.
Plans and commissions
#### Free
- No monthly fee.
- 8% on each ticket, minimum 0.60 EUR per ticket.
- A Mollie account is needed, here too, to collect the commission.
- Payments by card via Mollie.
#### Pro
- One location.
- 250 EUR/year or 25 EUR/month.
- 0% commission on tickets.
- Payments by card via Mollie and by PayPal.
- Your logo on the page and on the tickets.
- WhatsApp and SMS reminders.
- PDF flyers in 7 languages.
- Ready-made texts for social media.
- Customisable emails.
#### Pro Multi
- The first location is included; each extra location costs 25 EUR/month, up to 5 locations.
- For more than 5 locations, write to [email protected].
- 350 EUR/year or 35 EUR/month.
- Everything Pro has.
Where the data lives
Booking, seat and payment data live on the mee-table system, on api.mee-table.com, not in the WordPress database.
What you pay: fees and commissions
There are two separate charges: mee-table's ticket commission and the fee charged by your payment provider.
What mee-table charges:
- Cooking classes on mee-table: Free 12% (minimum EUR 1 per ticket after the trial), Bronze 5%, Silver 3%, Gold 2%.
- Dating events: 15% during the trial, then 20% on Free, 15% Bronze, 12% Silver, 10% Gold.
- Gift cards: 5%, from the Silver plan up and during the trial.
- mee-class: Free 8% (minimum EUR 0.60 per ticket); Pro and Pro Multi 0%. A class gift on Pro or Pro Multi has a fixed 5% fee.
- Minimum ticket prices: adults EUR 10; children EUR 5, only when accompanied by an adult.
What the payment provider charges:
The venue pays these fees directly to its own provider. They are separate from mee-table's commission, and mee-table earns nothing from them. Checked on 30 September 2026.
EUR example: a EUR 40 class ticket in Italy on the Free plan, paid with an Italian card through Mollie.
- Ticket: 40.00 EUR
- mee-table commission: 4.80 EUR
- Provider fee: 0.73 EUR
- Venue keeps: 34.47 EUR
Rates change: the provider's page is always the reference. For all details, read the full page: https://mee-table.com/fees
You do not need a degree to install it.
Try free for 14 days